Footprinting
Notes received from an anonymous contributor, with consent.
Enumeration Principles
- Our goal is not to get at the systems but to find all the ways to get there.
- Tenets of Enumeration:
- There is more than meets the eye. Consider all points of view.
- Distinguish between what we see and what we do not see.
- There are always ways to gain more information. Understand the target.
Enumeration Methodology
- 3 Levels:
- Infrastructure-based
- Host-based
- OS-Based
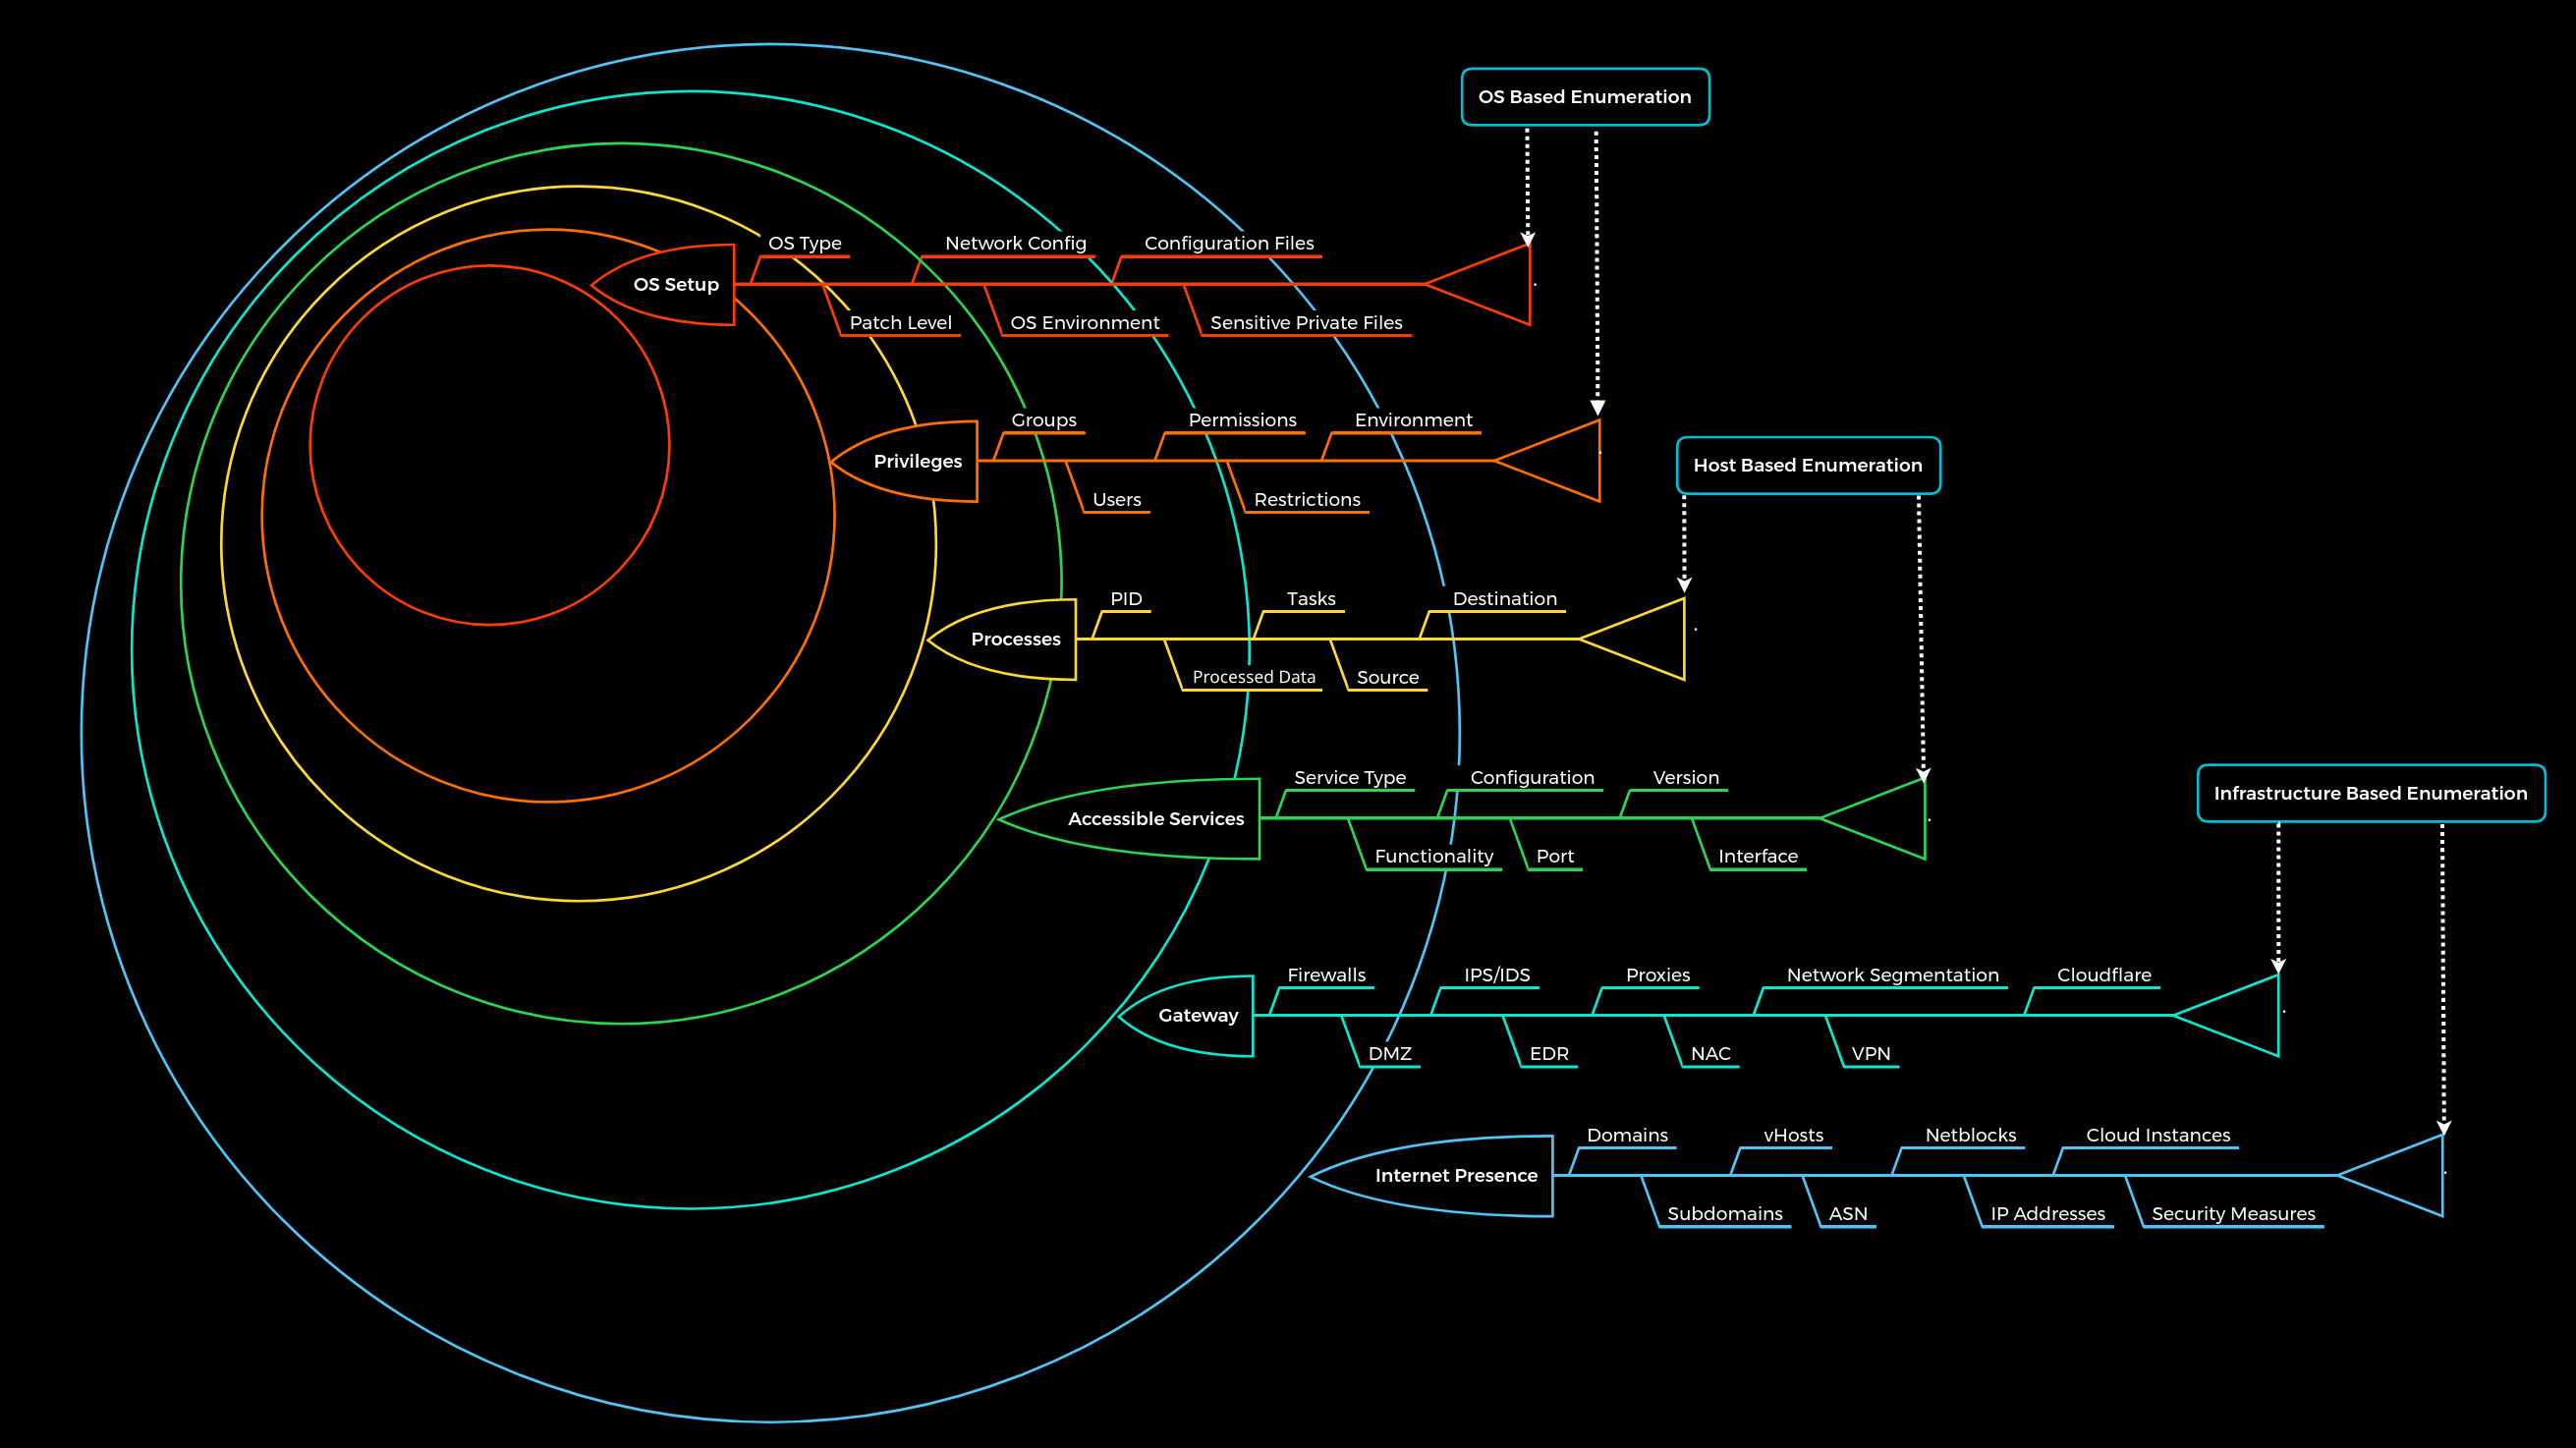
The image is not a full list of items, just the main categories.
| Layer | Description | Information Categories |
|---|---|---|
| 1. Internet Presence | Identification of internet presence and externally accessible infrastructure. | Domains, Subdomains, vHosts, ASN, Netblocks, IP Addresses, Cloud Instances, Security Measures |
| 2. Gateway | Identify the possible security measures protecting the company's external and internal infrastructure. | Firewalls, DMZ, IPS/IDS, EDR, Proxies, NAC, Network Segmentation, VPN, Cloudflare |
| 3. Accessible Services | Identify accessible interfaces and services that are hosted externally or internally. | Service Type, Functionality, Configuration, Port, Version, Interface |
| 4. Processes | Identify the internal processes, sources, and destinations associated with the services. | PID, Processed Data, Tasks, Source, Destination |
| 5. Privileges | Identification of the internal permissions and privileges to the accessible services. | Groups, Users, Permissions, Restrictions, Environment |
| 6. OS Setup | Identification of the internal components and systems setup. | OS Type, Patch Level, Network Configuration, OS Environment, Configuration Files, Sensitive Private Files |
- Internet presence: The goal of this layer is to identify all possible target systems and interfaces that can be tested.
- Gateway: The goal is to understand what we are dealing with and what we have to watch out for.
- Accessible Services: This layer aims to understand the reason and functionality of the target system and gain the necessary knowledge to communicate with it and exploit it for our purposes effectively.
- Processes: The goal here is to understand these factors and identify the dependencies between them.
- Privileges: It is crucial to identify these and understand what is and is not possible with these privileges.
- OS Setup: The goal here is to see how the administrators manage the systems and what sensitive internal information we can glean from them.
Domain Information
- Passive Enumeration:
- Third Party services
- Company Main Website
Online Presence
- SSL Certificate: Same certificate could be used for multiple domains, revealing multiple subdomains
- crt.sh: Subdomain Enumeration
- Example:
curl -s https://crt.sh/\?q\=inlanefreight.com\&output\=json | jq .
- Finding hosts directly accessible from the internet and not hosted by third-party hosts:
for i in $(cat subdomainlist);do host $i | grep "has address" | grep inlanefreight.com | cut -d" " -f1,4;done
- Shodan: Find devices and systems permanently connected to the internet.
- Getting IP Lists from shodan:
for i in $(cat ip-addresses.txt);do shodan host $i;done
- DNS Records: Use the
digcommand to discover DNS records.
dig any <domain>
Cloud Resources
- AWS, GCP, Azure
- Even though companies may provide infra centrally, it doesn't mean it's secure, mainly due to the choices of configuration made by the respective administrators.
- Enumerating company-hosted servers:
for i in $(cat subdomainlist);do host $i | grep "has address" | grep inlanefreight.com | cut -d" " -f1,4;done
- Cloud storage can often be found in DNS lists, more so when used by other employees of the company.
- Google Dorks:
inurl:andintext:google dorks can help with finding hidden resources that are indexed online. - domain.glass: Does a DNS/Whois lookup and also provides info about the company infrastructure.
- GrayHatWarfare: Does a similar thing to domain.glass, but also allows filtering based on AWS, GCP and other cloud providers.
- Leaked SSH Keys: Leaked public and private keys allow users to log on to machines without a password.
Staff
- Look for employees on LinkedIn or Xing. Look at the job postings of the company to know the potential tech stack they use and/or the skillset of the staff. Look at employee profiles.
FTP
-
Application layer
-
Control channel via port 21 comms channel via port 20.
-
Cleartext protocol so it can be sniffed if the network conditions are right.
-
Anonymous FTP login
-
TFTP: Trivial FTP, for file transfers. No auth, uses UDP. Can't list directories.
-
Default Configuration:
- vsFTPd
- Config file:
cat /etc/vsftpd.conf | grep -v "#"
| Setting | Description |
|---|---|
listen=NO |
Run from inetd or as a standalone daemon? |
listen_ipv6=YES |
Listen on IPv6? |
anonymous_enable=NO |
Enable anonymous access? |
local_enable=YES |
Allow local users to log in? |
dirmessage_enable=YES |
Display active directory messages when users go into certain directories? |
use_localtime=YES |
Use local time? |
xferlog_enable=YES |
Activate logging of uploads/downloads? |
connect_from_port_20=YES |
Connect from port 20? |
secure_chroot_dir=/var/run/vsftpd/empty |
Name of an empty directory. |
pam_service_name=vsftpd |
This string is the name of the PAM service vsftpd will use. |
rsa_cert_file=/etc/ssl/certs/ssl-cert-snakeoil.pem |
Specifies the location of the RSA certificate used for SSL-encrypted connections. |
rsa_private_key_file=/etc/ssl/private/ssl-cert-snakeoil.key |
Specifies the location of the RSA private key used for SSL-encrypted connections. |
ssl_enable=NO |
Enable SSL/TLS encrypted connections? |
FTPusers
/etc/ftpuserscontains users that are denied FTP access, so pay attention to it.
Dangerous Settings
| Setting | Description |
|---|---|
anonymous_enable=YES |
Allow anonymous login? |
anon_upload_enable=YES |
Allow anonymous users to upload files? |
anon_mkdir_write_enable=YES |
Allow anonymous users to create new directories? |
no_anon_password=YES |
Do not ask anonymous users for a password? |
anon_root=/home/username/ftp |
Root directory for anonymous users. |
write_enable=YES |
Allow the use of FTP write commands such as STOR, DELE, RNFR, RNTO, MKD, RMD, APPE, and SITE. |
- Anonymous Login: Allows users to login without legitimate credentials.
- vsFTPd Status: Shows server Status
- vsFTPd detailed output: Gives detailed output
| Setting | Description |
|---|---|
dirmessage_enable=YES |
Show a message when users first enter a new directory? |
chown_uploads=YES |
Change ownership of anonymously uploaded files? |
chown_username=username |
User who is given ownership of anonymously uploaded files. |
local_enable=YES |
Enable local users to log in? |
chroot_local_user=YES |
Restrict local users to their home directory (chroot jail)? |
chroot_list_enable=YES |
Use a list of local users for chroot behavior exceptions/configuration? |
hide_ids=YES |
Display all user and group information in directory listings as "ftp". |
ls_recurse_enable=YES |
Allow recursive directory listings. |
- Download a file: Use the
getcommand - Downloading all available ftp files:
wget -m --no-passive ftp://anonymous:[email protected]
- Uploading a file: Use the
putcommand
Footprinting FTP
- Nmap: The nmap scripting engine contains various scripts for footprinting FTP.
- Connecting with FTP which has SSL/TLS:
openssl s_client -connect 10.129.14.136:21 -starttls ftp
SMB
- Regulates access to files and directories, and other network resources such as printers, routers or interfaces released for the network.
Samba
- Implements CIFS (Common Internet File System), originally created
| SMB Version | Supported | Features |
|---|---|---|
| CIFS | Windows NT 4.0 | Communication via NetBIOS interface |
| SMB 1.0 | Windows 2000 | Direct connection via TCP |
| SMB 2.0 | Windows Vista, Windows Server 2008 | Performance upgrades, improved message signing, caching feature |
| SMB 2.1 | Windows 7, Windows Server 2008 R2 | Locking mechanisms |
| SMB 3.0 | Windows 8, Windows Server 2012 | Multichannel connections, end-to-end encryption, remote storage access |
| SMB 3.0.2 | Windows 8.1, Windows Server 2012 R2 | — |
| SMB 3.1.1 | Windows 10, Windows Server 2016 | Integrity checking, AES-128 encryption |
Default Configuration
user@htb[/htb]$ cat /etc/samba/smb.conf | grep -v "#\|\;"

[global]
   workgroup = DEV.INFREIGHT.HTB
   server string = DEVSMB
   log file = /var/log/samba/log.%m
   max log size = 1000
   logging = file
   panic action = /usr/share/samba/panic-action %d

   server role = standalone server
   obey pam restrictions = yes
   unix password sync = yes

   passwd program = /usr/bin/passwd %u
   passwd chat = *Enter\snew\s*\spassword:* %n\n *Retype\snew\s*\spassword:* %n\n *password\supdated\ssuccessfully* .

   pam password change = yes
   map to guest = bad user
   usershare allow guests = yes

[printers]
   comment = All Printers
   browseable = no
   path = /var/spool/samba
   printable = yes
   guest ok = no
   read only = yes
   create mask = 0700

[print$]
   comment = Printer Drivers
   path = /var/lib/samba/printers
   browseable = yes
   read only = yes
   guest ok = no
Default Settings
| Setting | Description |
|---|---|
[sharename] |
The name of the network share. |
workgroup = WORKGROUP/DOMAIN |
Workgroup that will appear when clients query. |
path = /path/here/ |
The directory to which the user is to be given access. |
server string = STRING |
The string that will show up when a connection is initiated. |
unix password sync = yes |
Synchronize the UNIX password with the SMB password. |
usershare allow guests = yes |
Allow non-authenticated users to access the defined share. |
map to guest = bad user |
Specifies what to do when a user login request doesn't match a valid UNIX user. |
browseable = yes |
Should this share be shown in the list of available shares? |
guest ok = yes |
Allow connecting to the service without using a password. |
read only = yes |
Allow users to read files only. |
create mask = 0700 |
Specifies the permissions to set for newly created files. |
Dangerous Settings
| Setting | Description |
|---|---|
browseable = yes |
Allow listing available shares in the current share. |
read only = no |
Forbid the creation and modification of files. |
writable = yes |
Allow users to create and modify files. |
guest ok = yes |
Allow connecting to the service without using a password. |
enable privileges = yes |
Honor privileges assigned to a specific SID. |
create mask = 0777 |
Specifies the permissions to assign to newly created files. |
directory mask = 0777 |
Specifies the permissions to assign to newly created directories. |
logon script = script.sh |
Script to execute when the user logs in. |
magic script = script.sh |
Script to execute when the specified script is closed. |
magic output = script.out |
Location where the output of the magic script is stored. |
- NOTE: Look at the man pages for samba to get a better overview of the dangerous settings.
SMBClient
- Connecting to a share:
smbclient -N -L //<ip>/sharename - Downloading a file:
get <file> - Check Status:
smbstatus
Footprinting SMB
- Nmap:
nmap 10.129.14.128 -sV -sC -p139,445 - RPCClient:
rpcclient -U "" 10.129.14.128(look at man page for more details)
| Query | Description |
|---|---|
srvinfo |
Server information. |
enumdomains |
Enumerate all domains that are deployed in the network. |
querydominfo |
Provides domain, server, and user information of deployed domains. |
netshareenumall |
Enumerates all available shares. |
netsharegetinfo <share> |
Provides information about a specific share. |
enumdomusers |
Enumerates all domain users. |
queryuser <RID> |
Provides information about a specific user. |
querygroup <rid> |
Provides information about a specific group. |
- Bruteforcing user RIDs:
for i in $(seq 500 1100);do rpcclient -N -U "" 10.129.14.128 -c "queryuser 0x$(printf '%x\n' $i)" | grep "User Name\|user_rid\|group_rid" && echo "";done
- Impacket samrdump.py:
impacket_samrdump <ip>(changes based on OS) - SMBmap:
smbmap <ip> - CrackMapExec:
crackmapexec smb 10.129.14.128 --shares -u '' -p '' - enum4linux-ng:
./enum4linux-ng.py 10.129.14.128 -A
NFS
- Network File System
- Port 111 (tcp, udp)
- No authorization
- Common auth mechanism via unix uid/gid and group memberships.
Default Configuration
/etc/exportscontains a table of physical filesystems on the server accessible by the clients.
user@htb[/htb]$ cat /etc/exports

# /etc/exports: the access control list for filesystems which may be exported
#               to NFS clients.  See exports(5).
#
# Example for NFSv2 and NFSv3:
# /srv/homes       hostname1(rw,sync,no_subtree_check) hostname2(ro,sync,no_subtree_check)
#
# Example for NFSv4:
# /srv/nfs4        gss/krb5i(rw,sync,fsid=0,crossmnt,no_subtree_check)
# /srv/nfs4/homes  gss/krb5i(rw,sync,no_subtree_check)
- Options:
| Option | Description |
|---|---|
rw |
Read and write permissions. |
ro |
Read-only permissions. |
sync |
Synchronous data transfer (a bit slower). |
async |
Asynchronous data transfer (a bit faster). |
secure |
Ports above 1024 will not be used. |
insecure |
Ports above 1024 will be used. |
no_subtree_check |
Disables checking of subdirectory trees. |
root_squash |
Maps files created by the root user (UID/GID 0) to the anonymous UID/GID, preventing root from having root privileges on an NFS mount. |
- ExportFS: Shares the folder to a specified subnet
root@nfs:~# echo '/mnt/nfs  10.129.14.0/24(sync,no_subtree_check)' >> /etc/exports
root@nfs:~# systemctl restart nfs-kernel-server
root@nfs:~# exportfs

/mnt/nfs        10.129.14.0/24
Dangerous Settings
| Option | Description |
|---|---|
rw |
Read and write permissions. |
insecure |
Ports above 1024 will be used. |
nohide |
If another file system is mounted beneath an exported directory, it is also exported through its own export entry. |
no_root_squash |
Files created by the root user retain UID/GID 0, allowing the root user on the client to have root privileges on the exported file system. |
Footprinting NFS
- TCP ports 111 and 2049 are essential.
- Nmap:
- rpcinfo: Retrieves a list of all currently running RPC services, their names and descriptions, and the ports they use.
user@htb[/htb]$ sudo nmap 10.129.14.128 -p111,2049 -sV -sC

Starting Nmap 7.80 ( https://nmap.org ) at 2021-09-19 17:12 CEST
Nmap scan report for 10.129.14.128
Host is up (0.00018s latency).

PORT    STATE SERVICE VERSION
111/tcp open  rpcbind 2-4 (RPC #100000)
| rpcinfo:
|   program version    port/proto  service
|   100000  2,3,4        111/tcp   rpcbind
|   100000  2,3,4        111/udp   rpcbind
|   100000  3,4          111/tcp6  rpcbind
|   100000  3,4          111/udp6  rpcbind
|   100003  3           2049/udp   nfs
|   100003  3           2049/udp6  nfs
|   100003  3,4         2049/tcp   nfs
|   100003  3,4         2049/tcp6  nfs
|   100005  1,2,3      41982/udp6  mountd
|   100005  1,2,3      45837/tcp   mountd
|   100005  1,2,3      47217/tcp6  mountd
|   100005  1,2,3      58830/udp   mountd
|   100021  1,3,4      39542/udp   nlockmgr
|   100021  1,3,4      44629/tcp   nlockmgr
|   100021  1,3,4      45273/tcp6  nlockmgr
|   100021  1,3,4      47524/udp6  nlockmgr
|   100227  3           2049/tcp   nfs_acl
|   100227  3           2049/tcp6  nfs_acl
|   100227  3           2049/udp   nfs_acl
|_  100227  3           2049/udp6  nfs_acl
2049/tcp open  nfs_acl 3 (RPC #100227)
MAC Address: 00:00:00:00:00:00 (VMware)

Service detection performed. Please report any incorrect results at https://nmap.org/submit/ .
Nmap done: 1 IP address (1 host up) scanned in 6.58 seconds
sudo nmap --script nfs* 10.129.14.128 -sV -p111,2049
- Show available NFS shares:
user@htb[/htb]$ showmount -e 10.129.14.128

Export list for 10.129.14.128:
/mnt/nfs 10.129.14.0/24
- Mount an NFS share:
user@htb[/htb]$ mkdir target-NFS
user@htb[/htb]$ sudo mount -t nfs 10.129.14.128:/ ./target-NFS/ -o nolock
user@htb[/htb]$ cd target-NFS
user@htb[/htb]$ tree .

.
└── mnt
    └── nfs
        ├── id_rsa
        ├── id_rsa.pub
        └── nfs.share

2 directories, 3 files
- List contents with usernames and group names:
ls -l mnt/nfs/ # Contents with usernames and group names
ls -n mnt/nfs/ # Contents with UIDs and GUIDs
- If root_squash is set, the files cannot be edited.
- Unmounting:
sudo umount ./target-NFS
DNS
- Full Form: Domain Name System
| Server Type | Description |
|---|---|
| DNS Root Server | The root servers of the DNS are responsible for the top-level domains (TLDs). As the last instance, they are only requested if the name server does not respond. Thus, a root server is a central interface between users and content on the Internet, as it links domain names and IP addresses. The Internet Corporation for Assigned Names and Numbers (ICANN) coordinates the work of the root name servers. There are 13 such root servers around the globe. |
| Authoritative Nameserver | Authoritative name servers hold authority for a particular DNS zone. They only answer queries for their area of responsibility, and their information is considered authoritative. If an authoritative name server cannot answer a client's query, the root name server helps direct the request. Based on the domain, organization, or country, authoritative nameservers provide answers to recursive DNS nameservers, assisting in locating the correct web server(s). |
| Non-authoritative Nameserver | Non-authoritative name servers are not responsible for a particular DNS zone. Instead, they obtain information about DNS zones by performing recursive or iterative DNS queries and return cached or retrieved results to clients. |
| Caching DNS Server | Caching DNS servers temporarily store DNS information obtained from other name servers for a specified period, reducing lookup time for repeated requests. The authoritative name server determines the cache duration using the Time to Live (TTL) value. |
| Forwarding Server | Forwarding servers perform a single function: they forward DNS queries to another DNS server, typically a recursive resolver, instead of resolving the queries themselves. |
| Resolver | Resolvers are not authoritative DNS servers but perform domain name resolution locally on a computer, router, or operating system by sending DNS queries to appropriate DNS servers and returning the corresponding IP addresses. |
- DNS is unencrypted
- DNS Records:
| DNS Record | Description |
|---|---|
| A | Returns the IPv4 address associated with the requested domain name. |
| AAAA | Returns the IPv6 address associated with the requested domain name. |
| MX | Specifies the mail server(s) responsible for receiving email on behalf of the domain. |
| NS | Identifies the authoritative DNS name servers for the domain. |
| TXT | Stores arbitrary text information. Common uses include domain ownership verification (e.g., Google Search Console), SSL certificate validation, and email authentication records such as SPF, DKIM, and DMARC to help prevent spam and email spoofing. |
| CNAME | Creates an alias for another domain name. For example, if www.example.com should point to the same IP address as example.com, you create an A record for example.com and a CNAME record for www.example.com. |
| PTR | Used for reverse DNS lookups by mapping an IP address back to its corresponding domain name. |
| SOA | The Start of Authority (SOA) record provides administrative information about the DNS zone, including the primary nameserver, the email address of the administrator, the zone serial number, and DNS synchronization timers. |
Default Configuration
- 3 types configuration files:
- local DNS config files
- zone files
- reverse name resolution files
- Usually the DNS server Bind9 is used in linux distros.
- Usual configuration files are
named.conf,named.conf.local,named.conf.options,named.conf.log.
root@bind9:~# cat /etc/bind/named.conf.local

//
// Do any local configuration here
//

// Consider adding the 1918 zones here, if they are not used in your
// organization
//include "/etc/bind/zones.rfc1918";
zone "domain.com" {
    type master;
    file "/etc/bind/db.domain.com";
    allow-update { key rndc-key; };
};
- Reverse name resolution zone files
root@bind9:~# cat /etc/bind/db.10.129.14

;
; BIND reverse data file for local loopback interface
;
$ORIGIN 14.129.10.in-addr.arpa
$TTL 86400
@     IN     SOA    dns1.domain.com.     hostmaster.domain.com. (
                    2001062501 ; serial
                    21600      ; refresh after 6 hours
                    3600       ; retry after 1 hour
                    604800     ; expire after 1 week
                    86400 )    ; minimum TTL of 1 day

      IN     NS     ns1.domain.com.
      IN     NS     ns2.domain.com.

5    IN     PTR    server1.domain.com.
7    IN     MX     mx.domain.com.
...SNIP...
Dangerous Settings
- Look at this resource for a list of vulns targeting bind9.
- Look at this archive by SecurityTrails for the most popular attacks on DNS servers.
| Option | Description |
|---|---|
| allow-query | Specifies which hosts or networks are permitted to send DNS queries to the server. |
| allow-recursion | Specifies which hosts or networks are allowed to perform recursive DNS queries through the server. |
| allow-transfer | Specifies which hosts or DNS servers are permitted to receive DNS zone transfers from the server. |
| zone-statistics | Enables the collection of statistical data and performance metrics for DNS zones. |
Footprinting DNS
- dig ns query:
dig ns inlanefreight.htb @10.129.14.128
- dig version query:
dig CH TXT version.bind 10.129.120.85
- dig any query:
dig any inlanefreight.htb @10.129.14.128
-
Zone Transfer: Transfer of zones to another server in DNS, usually happens over port 53.
-
dig axfr zone transfer:
dig axfr inlanefreight.htb @10.129.14.128
- Subdomain bruteforcing: Multiple ways
- ffuf:
ffuf -u https://example.com -H "Host: FUZZ.example.com" -w wordlist.txt -ac
- bash
user@htb[/htb]$ for sub in $(cat /opt/useful/seclists/Discovery/DNS/subdomains-top1million-110000.txt);do dig $sub.inlanefreight.htb @10.129.14.128 | grep -v ';\|SOA' | sed -r '/^\s*$/d' | grep $sub | tee -a subdomains.txt;done

ns.inlanefreight.htb.   604800  IN      A       10.129.34.136
mail1.inlanefreight.htb. 604800 IN      A       10.129.18.201
app.inlanefreight.htb.  604800  IN      A       10.129.18.15
- DNSEnum
user@htb[/htb]$ dnsenum --dnsserver 10.129.14.128 --enum -p 0 -s 0 -o subdomains.txt -f /opt/useful/seclists/Discovery/DNS/subdomains-top1million-110000.txt inlanefreight.htb

dnsenum VERSION:1.2.6

-----   inlanefreight.htb   -----


Host's addresses:
__________________


Name Servers:
______________

ns.inlanefreight.htb.                    604800   IN    A        10.129.34.136


Mail (MX) Servers:
___________________


Trying Zone Transfers and getting Bind Versions:
_________________________________________________

unresolvable name: ns.inlanefreight.htb at /usr/bin/dnsenum line 900 thread 1.

Trying Zone Transfer for inlanefreight.htb on ns.inlanefreight.htb ...
AXFR record query failed: no nameservers


Brute forcing with /home/cry0l1t3/Pentesting/SecLists/Discovery/DNS/subdomains-top1million-110000.txt:
_______________________________________________________________________________________________________

ns.inlanefreight.htb.                    604800   IN    A        10.129.34.136
mail1.inlanefreight.htb.                 604800   IN    A        10.129.18.201
app.inlanefreight.htb.                   604800   IN    A        10.129.18.15
ns.inlanefreight.htb.                    604800   IN    A        10.129.34.136

...SNIP...
done.
Exercise Tips
- Perform all operations on every subdomain.
- A subdomain might have subdomains so fuzz out those as well.
SMTP
- Sending emails in an IP network.
- Port 25 or Port 487
- Supports SSL/TLS
- SMTP Client: Mail User Agent (MUA)
- Mail Transfer Agent (MTA): Software to send ans receive emails
- Mail Submission Agent (MSA): Checks validity/origin of the mail
- Look up smtp here
Configuration
| Command | Description |
|---|---|
| AUTH PLAIN | AUTH is a service extension used to authenticate the client. |
| HELO | The client logs in with its computer name and thus starts the session. |
| MAIL FROM | The client names the email sender. |
| RCPT TO | The client names the email recipient. |
| DATA | The client initiates the transmission of the email. |
| RSET | The client aborts the initiated transmission but keeps the connection between client and server. |
| VRFY | The client checks if a mailbox is available for message transfer. |
| EXPN | The client also checks if a mailbox is available for messaging with this command. |
| NOOP | The client requests a response from the server to prevent disconnection due to time-out. |
| QUIT | The client terminates the session. |
- TELNET - ELHO/HELO:
user@htb[/htb]$ telnet 10.129.14.128 25

Trying 10.129.14.128...
Connected to 10.129.14.128.
Escape character is '^]'.
220 ESMTP Server


HELO mail1.inlanefreight.htb

250 mail1.inlanefreight.htb


EHLO mail1

250-mail1.inlanefreight.htb
250-PIPELINING
250-SIZE 10240000
250-ETRN
250-ENHANCEDSTATUSCODES
250-8BITMIME
250-DSN
250-SMTPUTF8
250 CHUNKING
- Telnet - VRFY: Verify users on the system
VRFY root

252 2.0.0 root


VRFY cry0l1t3

252 2.0.0 cry0l1t3


VRFY testuser

252 2.0.0 testuser
Note: Sometimes we may have to work through a web proxy. We can also make this web proxy connect to the SMTP server. The command that we would send would then look something like this: CONNECT 10.129.14.128:25 HTTP/1.0
Dangerous Settings
- Open Relay Configuration:
0.0.0.0/0, this setting allows servers to send fake emails, also allows to spoof and read emails.
Footprinting
- Default:
sudo nmap 10.129.14.128 -sC -sV -p25 - Open Relay:
sudo nmap 10.129.14.128 -p25 --script smtp-open-relay -v
Exercise Solution
- Connect to port 25 using netcat and try running some command (I ran ELHO), the banner will show
- Use smtp_enum in msfconsole, plus the provided wordlist in the resources.
IMAP / POP3
- Imap: 143/993
- Pop3: 110/995
IMAP Commands
| Command | Description |
|---|---|
1 LOGIN username password |
User's login. |
1 LIST "" * |
Lists all directories. |
1 CREATE "INBOX" |
Creates a mailbox with a specified name. |
1 DELETE "INBOX" |
Deletes a mailbox. |
1 RENAME "ToRead" "Important" |
Renames a mailbox. |
1 LSUB "" * |
Returns a subset of names from the set of names that the User has declared as being active or subscribed. |
1 SELECT INBOX |
Selects a mailbox so that messages in the mailbox can be accessed. |
1 UNSELECT INBOX |
Exits the selected mailbox. |
1 FETCH <ID> all |
Retrieves data associated with a message in the mailbox. |
1 CLOSE |
Removes all messages with the Deleted flag set. |
1 LOGOUT |
Closes the connection with the IMAP server. |
POP3 Commands
| Command | Description |
|---|---|
USER username |
Identifies the user. |
PASS password |
Authentication of the user using its password. |
STAT |
Requests the number of saved emails from the server. |
LIST |
Requests from the server the number and size of all emails. |
RETR id |
Requests the server to deliver the requested email by ID. |
DELE id |
Requests the server to delete the requested email by ID. |
CAPA |
Requests the server to display the server capabilities. |
RSET |
Requests the server to reset the transmitted information. |
QUIT |
Closes the connection with the POP3 server. |
Dangerous Settings
| Setting | Description |
|---|---|
auth_debug |
Enables all authentication debug logging. |
auth_debug_passwords |
This setting adjusts log verbosity; submitted passwords and the authentication scheme are logged. |
auth_verbose |
Logs unsuccessful authentication attempts and their reasons. |
auth_verbose_passwords |
Passwords used for authentication are logged and can also be truncated. |
auth_anonymous_username |
Specifies the username to be used when logging in with the ANONYMOUS SASL mechanism. |
Footprinting
- Nmap:
sudo nmap 10.129.14.128 -sV -p110,143,993,995 -sC
- cURL:
curl -k 'imaps://10.129.14.128' --user user:p4ssw0rd
- openSSL TLS POP3:
openssl s_client -connect 10.129.14.128:pop3s
- openSSL TLS IMAP:
openssl s_client -connect 10.129.14.128:imaps
Exercise Solutions
- see nmap results with
-sC -sV -A - see nmap results with
-sC -sV -A openssl s_client -connect <ip>:imapsopenssl s_client -connect <ip>:pop3s- Steps:
- Login to the mailbox
A1 LIST "" *-> List all mailboxesA1 SELECT DEV.DEPARTMENT.INT *-> Select the dev.department.int mailboxA1 UID FETCH 1:*-> check if mail of UID 1 existsA1 FETCH 1 all-> Fetch headers of mail of UID 1 (contains the email)
- Follow all steps of question 4 and then do
A1 FETCH 1 body[text]
SNMP
- Port: UDP 161 (traps over port 162)
- MIB: Management Information Base, an independent format for storing device information. Written in ASN.1 (Abstract Sytax Notation One)
- OID: a unique sequence of numbers identifying the position of a node in the tree
- SNMPv1:
- No auth
- no encryption
- SNMPv2:
- Security via community string
- No encryption
- SNMPv3:
- Support auth
- username and password transmission via encryption (via pre-shared key, PSK)
- Community Strings: A password-like mechanism used to determine authentication
Default Configuration
user@htb[/htb]$ cat /etc/snmp/snmpd.conf | grep -v "#" | sed -r '/^\s*$/d'

sysLocation    Sitting on the Dock of the Bay
sysContact     Me <[email protected]>
sysServices    72
master  agentx
agentaddress  127.0.0.1,[::1]
view   systemonly  included   .1.3.6.1.2.1.1
view   systemonly  included   .1.3.6.1.2.1.25.1
rocommunity  public default -V systemonly
rocommunity6 public default -V systemonly
rouser authPrivUser authpriv -V systemonly
See the manpage for more details
Dangerous Settings
| Settings | Description |
|---|---|
rwuser noauth |
Provides access to the full OID tree without authentication. |
rwcommunity <community string> <IPv4 address> |
Provides access to the full OID tree regardless of where the requests were sent from. |
rwcommunity6 <community string> <IPv6 address> |
Same access as with rwcommunity with the difference of using IPv6. |
Footprinting the Service
- snmpwalk:
snmpwalk -v2c -c public 10.129.14.128
- onesixtyone:
user@htb[/htb]$ sudo apt install onesixtyone
user@htb[/htb]$ onesixtyone -c /opt/useful/seclists/Discovery/SNMP/snmp.txt 10.129.14.128
- braa:
user@htb[/htb]$ sudo apt install braa
user@htb[/htb]$ braa <community string>@<IP>:.1.3.6.*   # Syntax
user@htb[/htb]$ braa [email protected]:.1.3.6.*
Exercise
- Connect to the snmp service snmpwalk.
- Connect to the snmp service snmpwalk.
- Connect to the snmp service snmpwalk and let it run for a while.
MySQL
- Works according to the
client-servermodel - Primarily in
LAMPstack
Default Configuration
[client]
port        = 3306
socket      = /var/run/mysqld/mysqld.sock

[mysqld_safe]
pid-file    = /var/run/mysqld/mysqld.pid
socket      = /var/run/mysqld/mysqld.sock
nice        = 0

[mysqld]
skip-host-cache
skip-name-resolve
user        = mysql
pid-file    = /var/run/mysqld/mysqld.pid
socket      = /var/run/mysqld/mysqld.sock
port        = 3306
basedir     = /usr
datadir     = /var/lib/mysql
tmpdir      = /tmp
lc-messages-dir = /usr/share/mysql
explicit_defaults_for_timestamp

symbolic-links=0

!includedir /etc/mysql/conf.d/
Dangerous Settings
| Setting | Description |
|---|---|
user |
Sets which user the MySQL service will run as. |
password |
Sets the password for the MySQL user. |
admin_address |
The IP address on which to listen for TCP/IP connections on the administrative network interface. |
debug |
This variable indicates the current debugging settings. |
sql_warnings |
This variable controls whether single-row INSERT statements produce an information string if warnings occur. |
secure_file_priv |
This variable is used to limit the effect of data import and export operations. |
Footprinting the Service
- nmap:
sudo nmap 10.129.14.128 -sV -sC -p3306 --script mysql*
- Interact with MySQL Server:
$ mysql -u root -h 10.129.14.132
$ mysql -u root -pP4SSw0rd -h 10.129.14.128
Exercise
- run nmap on port 3306
- Commands:
mysql -u robin -probin -h 10.129.223.234 --ssl-verify-server-cert=falseuse customers;select name,email from myTable;
MSSQL
- Microsoft's flavor of SQL
- Clients:
- Use
impacket-mssqlclient
- Use
Default Databases
| Default System Database | Description |
|---|---|
| master | Tracks all system information for an SQL Server instance |
| model | Template database that acts as a structure for every new database created. Any setting changed in the model database will be reflected in any new database created after the changes to the model database |
| msdb | The SQL Server Agent uses this database to schedule jobs & alerts |
| tempdb | Stores temporary objects |
| resource | Read-only database containing system objects included with SQL Server |
Default Configuration
- Likely the service will run as
NT SERVICE\MSSQLSERVER. - Connection is usually possible via windows auth, but encryption is not enforced when attempting to connect.
- Windows auth means that it will either use the
SAMdatabase or the domain controller (the active directory host).
Dangerous Settings
- MSSQL clients not using encryption to connect to the MSSQL server
- The use of self-signed certificates when encryption is being used. It is possible to spoof self-signed certificates
- The use of named pipes
- Weak & default sa credentials. Admins may forget to disable this account
Footprinting
- nmap:
sudo nmap --script ms-sql-info,ms-sql-empty-password,ms-sql-xp-cmdshell,ms-sql-config,ms-sql-ntlm-info,ms-sql-tables,ms-sql-hasdbaccess,ms-sql-dac,ms-sql-dump-hashes --script-args mssql.instance-
- Metasploit:
msf6 auxiliary(scanner/mssql/mssql_ping) > set rhosts 10.129.201.248
- impacket:
impacket-mssqlclient [email protected] -windows-auth
Exercise
- Run nmap
- Connect using impacket and then
EXEC sp_databases;
Oracle TNS
- Communication between Oracle dbs and applications
- Protocols such as IPX/SPX, TCP/IP, IPv6, SSL/TLS
Default Configuration
- Port: TCP/1521
- Protocols: TCP/IP, UDP, IPX/SPX, AppleTalk
- Remote Management: Oracle 8i/9i
- Connection: Only Authorized Hosts
- Encryption: Oracle Net Services
- Configuration Files:
tnsnames.ora,listener.ora - Default Configuration File Location:
$ORACLE_HOME/network/admin - Default Password:
CHANGE_ON_INSTALL - Oracle DBSNMP Default Password:
dbsnmp
Note: Many organizations use
fingerwith oracle, which is risky and vulnerable if we have knowledge of the home directory.
tnsnames.ora
- Each service (db or otherwise) has a unique entry in
tnsnames.ora - Each entry usually has the name of a service, the database or service name that clients should use while connecting and the network location of the service.
ORCL =
  (DESCRIPTION =
    (ADDRESS_LIST =
      (ADDRESS = (PROTOCOL = TCP)(HOST = 10.129.11.102)(PORT = 1521))
    )
    (CONNECT_DATA =
      (SERVER = DEDICATED)
      (SERVICE_NAME = orcl)
    )
  )
listener.ora
- Defines the server side configuration
SID_LIST_LISTENER =
  (SID_LIST =
    (SID_DESC =
      (SID_NAME = PDB1)
      (ORACLE_HOME = C:\oracle\product\19.0.0\dbhome_1)
      (GLOBAL_DBNAME = PDB1)
      (SID_DIRECTORY_LIST =
        (SID_DIRECTORY =
          (DIRECTORY_TYPE = TNS_ADMIN)
          (DIRECTORY = C:\oracle\product\19.0.0\dbhome_1\network\admin)
        )
      )
    )
  )

LISTENER =
  (DESCRIPTION_LIST =
    (DESCRIPTION =
      (ADDRESS = (PROTOCOL = TCP)(HOST = orcl.inlanefreight.htb)(PORT = 1521))
      (ADDRESS = (PROTOCOL = IPC)(KEY = EXTPROC1521))
    )
  )

ADR_BASE_LISTENER = C:\oracle
- In short,
tnsnames.ora = client side configurationandlistener.ora = server side configuration - PL/SQL Exclusion List:
- User created txt file (
PlsqlExclusionList) - Location:
$ORACLE_HOME/sqldeveloper - Purpose: Contains the PL/SQL packages/types that're excluded from execution.
- It is a blacklist that cannot be accessed through the Oracle Application Server.
- User created txt file (
| Setting | Description |
|---|---|
DESCRIPTION |
A descriptor that provides a name for the database and its connection type. |
ADDRESS |
The network address of the database, which includes the hostname and port number. |
PROTOCOL |
The network protocol used for communication with the server. |
PORT |
The port number used for communication with the server. |
CONNECT_DATA |
Specifies the attributes of the connection, such as the service name or SID, protocol, and database instance identifier. |
INSTANCE_NAME |
The name of the database instance the client wants to connect. |
SERVICE_NAME |
The name of the service that the client wants to connect to. |
SERVER |
The type of server used for the database connection, such as dedicated or shared. |
USER |
The username used to authenticate with the database server. |
PASSWORD |
The password used to authenticate with the database server. |
SECURITY |
The type of security for the connection. |
VALIDATE_CERT |
Whether to validate the certificate using SSL/TLS. |
SSL_VERSION |
The version of SSL/TLS to use for the connection. |
CONNECT_TIMEOUT |
The time limit in seconds for the client to establish a connection to the database. |
RECEIVE_TIMEOUT |
The time limit in seconds for the client to receive a response from the database. |
SEND_TIMEOUT |
The time limit in seconds for the client to send a request to the database. |
SQLNET.EXPIRE_TIME |
The time limit in seconds for the client to detect a connection has failed. |
TRACE_LEVEL |
The level of tracing for the database connection. |
TRACE_DIRECTORY |
The directory where the trace files are stored. |
TRACE_FILE_NAME |
The name of the trace file. |
LOG_FILE |
The file where the log information is stored. |
Environment Setup
- Some packages are needed to be downloaded to interact with the TNS server.
user@htb[/htb]$ sudo apt-get update
sudo apt-get install -y build-essential python3-dev libaio1
cd ~
wget https://files.pythonhosted.org/packages/source/c/cx_Oracle/cx_Oracle-8.3.0.tar.gz
tar xzf cx_Oracle-8.3.0.tar.gz
cd cx_Oracle-8.3.0
python3 setup.py build
sudo python3 setup.py install
cd ~
git clone https://github.com/quentinhardy/odat.git
cd odat/
pip install python-libnmap
git submodule init
git submodule update
sudo apt-get install python3-scapy -y
sudo pip3 install colorlog termcolor passlib python-libnmap
sudo apt-get install build-essential libgmp-dev -y
pip3 install pycryptodome
pip3 install openpyxl

Hit:1 https://deb.parrot.sh/parrot lory InRelease
Hit:2 https://deb.parrot.sh/direct/parrot lory-security InRelease
Hit:3 https://deb.parrot.sh/parrot lory-backports InRelease
Reading package lists... Done
Reading package lists... Done
Building dependency tree... Done
Reading state information... Done
build-essential is already the newest version (12.9).
python3-dev is already the newest version (3.11.2-1+b1).
python3-dev set to manually installed.
libaio1 is already the newest version (0.3.113-4).
libaio1 set to manually installed.
- Testing ODAT (Oracle Database Attacking Tool):
- Open Source tool to enumerate and exploit vulns such as SQLi, RCE and privesc in Oracle Databases.
$ ./odat.py -h

{all,tnscmd,tnspoison,sidguesser,snguesser,passwordguesser,utlhttp,httpuritype,utltcp,ctxsys,externaltable,dbmsxslprocessor,dbmsadvisor,utlfile,dbmsscheduler,java,passwordstealer,oradbg,dbmslob,stealremotepwds,userlikepwd,smb,privesc,cve,search,unwrapper,clean}
               ...

            _  __   _  ___
           / \|  \ / \|_ _|
          ( o ) o ) o || |
           \_/|__/|_n_||_|
-------------------------------------------
  _        __           _           ___
 / \      |  \         / \         |_ _|
( o )       o )         o |         | |
 \_/racle |__/atabase |_n_|ttacking |_|ool
-------------------------------------------

By Quentin Hardy ([email protected] or [email protected])
Footprinting The Service
- nmap:
- SID: a unique identifier for a db instance. We connect to an instance using the SID. If the client doesn't specify the SID, the standard one defined in tnsnames.ora is used.
sudo nmap -p1521 -sV 10.129.204.235 --open
sudo nmap -p1521 -sV 10.129.204.235 --open --script oracle-sid-brute # bruteforce Oracle SID
- ODAT:
./odat.py all -s 10.129.204.235
- SQLPlus:
sudo apt install oracle-instantclient-sqlplus # installation
if you encounter sqlplus: error while loading shared libraries: libsqlplus.so: cannot open shared object file: No such file or directory, do this
sudo sh -c "echo /usr/lib/oracle/12.2/client64/lib > /etc/ld.so.conf.d/oracle-instantclient.conf";sudo ldconfig
sqlplus scott/[email protected]/XE # Login
- Oracle RDBMS Interaction:
select table_name from all_tables; //Select all tables
- Oracle RDBMS - Database Enumeration
sqlplus scott/[email protected]/XE as sysdba
- Oracle RDBMS Extract Password Hashes:
select name, password from sys.user$;
- Default Paths:
| OS | Path |
|---|---|
| Linux | /var/www/html |
| Windows | C:\inetpub\wwwroot |
- Oracle RDBMS File Upload:
echo "Oracle File Upload Test" > testing.txt # Create the file
./odat.py utlfile -s 10.129.204.235 -d XE -U scott -P tiger --sysdba --putFile C:\\inetpub\\wwwroot testing.txt ./testing.txt # Upload the file according to the default paths and OS
curl -X GET http://10.129.204.235/testing.txt # test if the upload worked by trying to access the webserver at port 80 with the file.
Exercises
- use
./odat.pyas shown in the notes to brute the db name (we'll getXE). Then use the default credentials scott/tiger to login. Use the commandsqlplus scott/[email protected]/XE as sysdbathen dump password hashes.
IPMI
- Port: 623
Footprinting The Service
- nmap:
sudo nmap -sU --script ipmi-version -p 623 ilo.inlanfreight.local
- Metasploit:
msf6 > use auxiliary/scanner/ipmi/ipmi_version
msf6 auxiliary(scanner/ipmi/ipmi_version) > set rhosts 10.129.42.195
msf6 auxiliary(scanner/ipmi/ipmi_version) > show options
msf6 auxiliary(scanner/ipmi/ipmi_version) > run
- Default Passwords:
| Product | Username | Password |
|---|---|---|
| Dell iDRAC | root |
calvin |
| HP iLO | Administrator |
Randomized 8-character string consisting of numbers and uppercase letters |
| Supermicro IPMI | ADMIN |
ADMIN |
NOTE: Usually it is better to know the default passwords of ANY service we discover, some good sources (this is not from the material) are this, and this.
Dangerous Settings
- IPMI Remote Cracking: Use this if default creds dont work.
- During auth a salted SHA1 or MD5 is sent by the server to the user's client before the actual authentication.
- These can be cracked with hashcat as follows:
hashcat -m 7300 ipmi.txt -a 3 ?1?1?1?1?1?1?1?1 -1 ?d?u #Crack password for an 8 char password with uppercase letters and numbers
-
There is no fix for this because it is a flaw in IPMI itself.
-
Dumping Hashes using metasploit:
msf6 > use auxiliary/scanner/ipmi/ipmi_dumphashes
msf6 auxiliary(scanner/ipmi/ipmi_dumphashes) > set rhosts 10.129.42.195
msf6 auxiliary(scanner/ipmi/ipmi_dumphashes) > show options
msf6 auxiliary(scanner/ipmi/ipmi_dumphashes) > run
Try different wordlists to get the password if the default hashcat given here doesn't work.
Exercises
- Use ipmi_dumphashes to get the username and hashed password.
- Crack the passwords using hashcat
hashcat -m 7300 -a 0 ipmi.txt /usr/share/wordlists/rockyou.txt
Linux Remote Management Protocols
SSH
-
Port 22
-
Runs on all OS
-
SSH-2 is more advanced than SSH-1, for example it isn't vulnerable to MITM attacks unlike its predecessor.
-
Authentication Methods:
- Password
- Public Key
- Host-based
- Keyboard
- Challenge Response
- GSSAPI
-
Public Key Authentication:
- Server sends its public host key to the client, which verifies its Integrity.
- Client verifies by using a password, whose hash the server possesses.
- Private key is in the user's computer and secured with a passphrase.
- public keys are stored on the server.
Default Configuration
user@htb[/htb]$ cat /etc/ssh/sshd_config  | grep -v "#" | sed -r '/^\s*$/d'

Include /etc/ssh/sshd_config.d/*.conf
ChallengeResponseAuthentication no
UsePAM yes
X11Forwarding yes
PrintMotd no
AcceptEnv LANG LC_*
Subsystem       sftp    /usr/lib/openssh/sftp-server
| Setting | Description |
|---|---|
PasswordAuthentication yes |
Allows password-based authentication. |
PermitEmptyPasswords yes |
Allows the use of empty passwords. |
PermitRootLogin yes |
Allows login as the root user. |
Protocol 1 |
Uses an outdated version of encryption. |
X11Forwarding yes |
Allows X11 forwarding for GUI applications. |
AllowTcpForwarding yes |
Allows forwarding of TCP ports. |
PermitTunnel |
Allows tunneling. |
DebianBanner yes |
Displays a specific banner when logging in. |
- Password auth allows us to bruteforce credentials with special
patterns, which take known passwords and mutate them, which have a very high accuracy.
Footprinting The Service
- SSH-Audit:
user@htb[/htb]$ git clone https://github.com/jtesta/ssh-audit.git && cd ssh-audit
user@htb[/htb]$ ./ssh-audit.py 10.129.14.132
- Change Authentication Method:
ssh -v [email protected]
ssh -v [email protected] -o PreferredAuthentications=password # Password is set to be the preferred authentication
Rsync
- Port 873
- Pentesting Guide
- Discovery using nmap:
sudo nmap -sV -p 873 127.0.0.1
- Searching for accessible shares:
nc -nv 127.0.0.1 873

(UNKNOWN) [127.0.0.1] 873 (rsync) open
@RSYNCD: 31.0
@RSYNCD: 31.0
#list
dev             Dev Tools
@RSYNCD: EXIT
- Enumerating an open share:
user@htb[/htb]$ rsync -av --list-only rsync://127.0.0.1/dev

receiving incremental file list
drwxr-xr-x             48 2022/09/19 09:43:10 .
-rw-r--r--              0 2022/09/19 09:34:50 build.sh
-rw-r--r--              0 2022/09/19 09:36:02 secrets.yaml
drwx------             54 2022/09/19 09:43:10 .ssh

sent 25 bytes  received 221 bytes  492.00 bytes/sec
total size is 0  speedup is 0.00
R-Services
- Ports: 512, 513, 514
- R-Commands:
- rcp (remote copy)
- rexec (remote execution)
- rlogin (remote login)
- rsh (remote shell)
- rstat
- rsupreme
- ruptime
- rwho (remote who)
| Command | Service Daemon | Port | Transport Protocol | Description |
|---|---|---|---|---|
| rcp | rshd |
514 | TCP | Copies a file or directory bidirectionally between the local and remote systems, or between two remote systems. Similar to cp on Linux, but provides no warning when overwriting existing files. |
| rsh | rshd |
514 | TCP | Opens a shell on a remote machine without a login procedure. Relies on trusted entries in /etc/hosts.equiv and .rhosts for validation. |
| rexec | rexecd |
512 | TCP | Enables a user to run shell commands on a remote machine. Requires username/password authentication over an unencrypted network socket. Authentication can be overridden by trusted entries in /etc/hosts.equiv and .rhosts. |
| rlogin | rlogind |
513 | TCP | Enables a user to log in to a remote host over the network. Similar to Telnet but intended for Unix-like hosts. Authentication can be overridden by trusted entries in /etc/hosts.equiv and .rhosts. |
- /etc/hosts.equiv: contains a list of trusted hosts and grants access to other systems on the network.
user@htb[/htb]$ cat /etc/hosts.equiv

# <hostname> <local username>
pwnbox cry0l1t3
- Scanning for r-services with nmap:
sudo nmap -sV -p 512,513,514 10.0.17.2

Starting Nmap 7.80 ( https://nmap.org ) at 2022-12-02 15:02 EST
Nmap scan report for 10.0.17.2
Host is up (0.11s latency).

PORT    STATE SERVICE    VERSION
512/tcp open  exec?
513/tcp open  login?
514/tcp open  tcpwrapped

Service detection performed. Please report any incorrect results at https://nmap.org/submit/ .
Nmap done: 1 IP address (1 host up) scanned in 145.54 seconds
- Access Control & Trusted Relationships:
- Rely on trusted information sent from remote client to host machine.
- They use PAM for authentication
- Can be bypassed using
/etc/hosts.equivand.rhosts
Note: The hosts.equiv file is recognized as the global configuration regarding all users on a system, whereas .rhosts provides a per-user configuration.
- Sample .rhosts:
user@htb[/htb]$ cat .rhosts

htb-student     10.0.17.5
+               10.0.17.10
+               +
- Logging in using rlogin:
user@htb[/htb]$ rlogin 10.0.17.2 -l htb-student

Last login: Fri Dec  2 16:11:21 from localhost

[htb-student@localhost ~]$
- Listing authenticated users using rwho and rusers:
user@htb[/htb]$ rwho

root     web01:pts/0 Dec  2 21:34
htb-student     workstn01:tty1  Dec  2 19:57  2:25

user@htb[/htb]$ rusers -al 10.0.17.5

htb-student     10.0.17.5:console          Dec 2 19:57     2:25
Windows Remote Management Protocols
RDP
- Supports SSL/TLS
- Default on windows servers
Footprinting The Service
$ nmap -sV -sC 10.129.201.248 -p3389 --script rdp*

Starting Nmap 7.92 ( https://nmap.org ) at 2021-11-06 15:45 CET
Nmap scan report for 10.129.201.248
Host is up (0.036s latency).

PORT     STATE SERVICE       VERSION
3389/tcp open  ms-wbt-server Microsoft Terminal Services
| rdp-enum-encryption:
|   Security layer
|     CredSSP (NLA): SUCCESS
|     CredSSP with Early User Auth: SUCCESS
|_    RDSTLS: SUCCESS
| rdp-ntlm-info:
|   Target_Name: ILF-SQL-01
|   NetBIOS_Domain_Name: ILF-SQL-01
|   NetBIOS_Computer_Name: ILF-SQL-01
|   DNS_Domain_Name: ILF-SQL-01
|   DNS_Computer_Name: ILF-SQL-01
|   Product_Version: 10.0.17763
|_  System_Time: 2021-11-06T13:46:00+00:00
Service Info: OS: Windows; CPE: cpe:/o:microsoft:windows

Service detection performed. Please report any incorrect results at https://nmap.org/submit/ .
Nmap done: 1 IP address (1 host up) scanned in 8.26 seconds
- Using
--packet-trace:
$ nmap -sV -sC 10.129.201.248 -p3389 --packet-trace --disable-arp-ping -n
- RDP Security Check:
$ sudo cpan
$ git clone https://github.com/CiscoCXSecurity/rdp-sec-check.git && cd rdp-sec-check
$ ./rdp-sec-check.pl 10.129.201.248
- Initiate RDP Session:
$ xfreerdp /u:cry0l1t3 /p:"P455w0rd!" /v:10.129.201.248
WinRM
- Ports: 5985, 5986
Footprinting The Service
- Nmap:
$ nmap -sV -sC 10.129.201.248 -p5985,5986 --disable-arp-ping -n
- Evil-WinRM:
$ evil-winrm -i 10.129.201.248 -u Cry0l1t3 -p P455w0rD!
WMI
- Windows Management Instrumentation
- Port: 135
Footprinting The Service
- WMIexec.py:
$ /usr/share/doc/python3-impacket/examples/wmiexec.py
Cry0l1t3:"P455w0rD!"@10.129.201.248 "hostname"

Impacket v0.9.22 - Copyright 2020 SecureAuth Corporation

[*] SMBv3.0 dialect used
ILF-SQL-01
Skill Assessments
Easy
- Objective: Read the
flag.txtfile. - In the question we are given credentials
ceil:qwer1234.
- Find open ports with masscan (run 2-3 times for consistency):
sudo masscan -e tun0 10.129.138.119 -p 1-65535,U:1-65535 --rate=1000 > masscan.txt
- Open Ports: 21,22,53,2121
- Port 21,2121: FTP
- Port 22: SSH (only private key connection allowed)
- Port 53: DNS
- Connect to FTP 2121 (port 21 is running as root so no perms). This is hinted at by the banner
Ceil's FTP. - The hint says to set specific perms for ssh_keys, so we'll extract the ssh keys.
cd ..after logging in to port 2121, andls .ssh/, thencd .ssh/andget id_rsa.- Now do
chmod 600 id_rsaand thenssh -i id_rsa ceil@<ip> - Read the flag from
/home/flag/flag.txt
Medium
- Objective: Obtain the credentials of the user
HTB - Credentials: Only a username
HTB
- Run masscan to get all open ports and run
nmap -sC -sV -A <ip> -p <discovered_ports> -o nmap.txtto enumerate them. - Some interesting services we'll note here are port 111 (NFS) and port 3389 (rdp).
- We can enumerate the RDP to find one completely accessible share which contains a lot of tickets. Most of these tickets are empty but one of them contains a chat log plus a set of credentials (find these by mounting the share and using
ls -lawithin the share. The non-zero sizes are what we look for). - Obtained Credentials:
alex:lol123!mD - Trying WinRM for this set of creds doesn't work but RDP works, so I login to RDP using these creds and
xfreerdp. - Within this we can see
MS SQL Server Management Studiobut we can't login with our current credentials for now. However we can see a default usersa. - Looking through the
alex's home directory we can see a devshare folder, which contains some credentials for the usersa. - Obtained Credentials:
sa:87N1ns@slls83 - However this doesn't allow us to log in. But we can try and stuff this password for the
Administratoraccount. - Obtained Credentials:
Administrator:87N1ns@slls83 - On doing this we can again login to RDP and the SQL Server (because its using Windows Auth).
- From here we just select the
dbo.devsacctable and view its contents (right click it and select the first 1000 rows). Export this as csv, and then open it in notepad, where you can search for theHTBuser.
NOTE: Though I just kind of wrote the solution here, I arrived at this by enumerating literally every single open port using the commands earlier in this module. This helps gain an understanding of that we're supposed to be attacking and what's useless. That's why I said port 111 and 3389 were interesting, but initially they were all at an equal level of priority for me.
Hard
- We have an MX management server, it also has a backup server for the internal accounts in the domain.
- Objective: Find the credentials of the
HTBuser.
- Run nmap UDP and TCP, to find Port 161 (snmp, udp) open and 110/995 (pop3, tcp), 143/993 (imap, tcp) open.
- Use
onesixtyoneto enumerate community strings (use/usr/share/wordlists/seclists/Discovery/SNMP/snmp.txt). - Use
braato enumerate the SNMP. - We obtain these credentials
tom:NMds732Js2761. - The pop3 login for these credentials reveals a message in the inbox. This contains an OpenSSH Private key.
- Use this key to login to the server as tom
ssh -i privkey tom@<ip>. - Do
ss -nltpto find port 3306 open. Login to mysql with the credentials we have fortom. - Go into the
usersdatabase and select theuserstable. This solves the question.